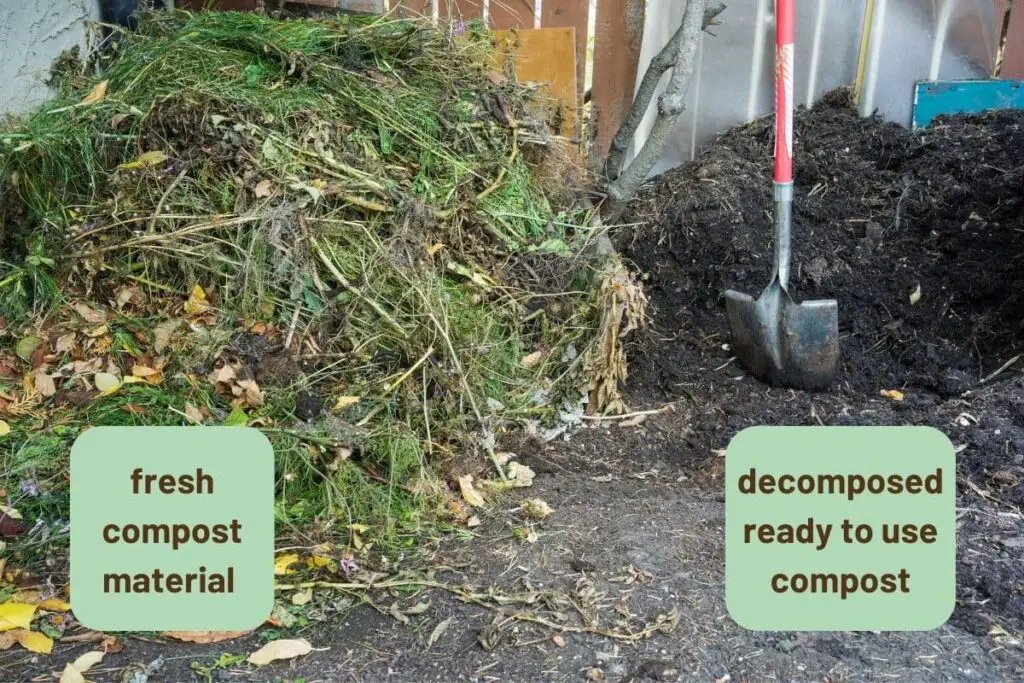
One of the great ideas to spend your time is to make your compost and grow some vegetables in your garden. The good news is that you don’t need to be an expert to make compost in your permaculture set-up.
Just a little research will set you in the right direction.
Simply put, compost can help keep your plants healthy. If you plan to have the best garden to feed your family, you can start by making your compost.
Why Compost
Making your compost will not only help reduce the amount of waste sent to landfills but also provides you with a sense of pride knowing you are helping our environment.
Adding compost to different soil types provides different forms of benefits. Better water and nutrient retention is aided with sandy soil whereas for clay soil, compost helps loosen the compacted particles for better air and water retention.
An extra bonus – you reduce the use of synthetic fertilizers by making your compost. According Texas Agrilife, compost improves the capacity of soil to hold water and nutrients. In addition, it also improves the overall characteristics of the soil.
It also helps soil erosion and allows plant roots to hold on to the nutrients because root systems grow better with compost added.
And to top it off – its ability to maintain the pH level of soil makes for better absorption of nutrients for your growing plants.
How to Compost
Compost is made up of organic substances such as wood cuttings, leaves, and branches, as well as, things like food scraps. There are materials which we can readily find in our kitchen such as food scraps, eggshells, coffee grounds, and vegetable wastage.
The United States Environmental Protection Agency (EPA) recommends three basic ingredients for your compost. These are browns in the likes of dried leaves, twigs, tree trunks. This organic material gives off the carbon needed for the compost. Browns are slower to break apart so it is important that you cut them into smaller sizes for faster decomposition.
Second is the greens, these include grass cuttings, vegetable and fruit cuttings. Greens are the ones that give off nitrogen, which breaks down more quickly as compared to browns. Greens are also richer in moisture content. It is important that you have enough greens and browns in your mix. The greens and browns are important in keeping the heat in your compost pile or bins. These ingredients are also vital to how fast or slow your materials are going to decompose. This will determine how long or short it will take for you to wait before the compost becomes ready.
The ideal mix of your Greens and Browns is 4:1. This means 4 Browns to 1 Green. But since every material has a different composition, you need to keep a close eye on your compost pile. If you notice that it is not heating off properly, then you can add more Greens to it.
The third ingredient is water which is vital for the decomposition of the browns and greens. Air, microorganisms, and nitrogen are also equally important components of your compost. Microorganisms are vital in breaking down organic materials but they would require enough air, water, and nitrogen to live.
Composting at home

Decide whether to go with a compost pile vs a compost bin.
Compost piles tend to take a bit more room and will convert slower. For the compost bin, depending on your preference, you can purchase the big-size bins or the small ones which you can tuck under your sink even if you’re trying to compost on a small scale.
Either way, you have to make sure that the location of both is near a water supply or you will have access to water to keep its moisture. Take time to cut down the sizes of your greens and browns. The larger its size the longer it would take for it to decompose.
If you keep adding organic materials, make sure that they are moist. Remember that compost bins and compost piles vary when it comes to being ready for use. Compost bins take as early as two weeks while compost piles take about a year, depending on the size of your pile.
Do It Yourself Composting
Do-it-yourself composting is possible by piling up about six to eight inches of brown materials in a wood pallet or your garden, after which add green materials on top of it. The top part should be composed of garden soil or compost you have made prior for microorganisms to be introduced to your greens and browns layers.
This layering should be repeated until the layers are decomposed and well mixed up. The layers must be turned to make sure that enough air enters the compost pile.
Make sure to turn the layers of your pile at least once a week. Take a shovel and make sure that the outer portion of the pile is mixed properly with the inner portion. This will make sure that the microorganisms can work across the pile of materials you have added.
How to Use Compost
You could use your compost in several ways depending on the plants you are growing. Compost is a great addition to your beds to make sure that your seeds are supplied with good nutrients.
You can also add compost to your houseplants like what you can grow in a windowsill garden.
For some, compost is used as mulch and added around trees. About two-three inches of mulch can be spread around your flower bed or shrub. You could also add some compost to your hanging plants and even plants in your patios. Since compost is useful in preventing soil erosion, it is also used in growing plants along hillsides.
WSA mentioned that one of the newest purposes of compost is bioremediation. Simply put, microorganisms from compost are used to remove contaminants that are present in water and soil.
You could also use your compost as a compost tea. Mix your compost and with at least 5-gallons of water. Leave it for at least two days and use the mixture to water your plants. You could also add the compost to your lawn. Add about one to three inches of compost into your lawn and water it down.
How Often Do You Turn Compost?
You will know your compost is ready when it does not give off heat whenever you turn the layers, the soil is dark in color, it does give off an offensive sour smell but rather gives off an earthy scent, and you can’t recognize any organic material added such as dry leaves or grass cuttings. The pH level should also be around 7.5. You can achieve this by turning the layer at least once a week.
Several things could happen if you use the compost prematurely. WSA reported that it is important for organic materials to be decomposed before adding them to the soil. Once it is added early on, decomposing continues, and the soil nutrient which is supposed to be for the plants will be used by the organic material to continue its decomposition. It is also more likely that your plant will attract pests and diseases causing bacteria. Turning the layers is important to make sure that premature decomposing and early compost harvest is avoided.
What not to Put in Compost
| Can Be Added | Can Not Be Added |
| Fruits and vegetables | Black walnut tree leaves or twigs |
| Eggshells | Coal or charcoal ash |
| Coffee grounds and filters | Dairy products (e.g., butter, milk, sour cream, yogurt) and eggs |
| Tea bags | Diseased or insect-ridden plants |
| Nut shells | Fats, grease, lard, or oils* |
| Shredded newspaper | Meat or fish bones and scraps* |
| Cardboard | Pet wastes (e.g., dog or cat feces, soiled cat litter)* |
| Paper | Yard trimmings treated with chemical pesticides |
| Yard trimmings | |
| Grass clippings | |
| Houseplants | |
| Hay and straw | |
| Leaves | |
| Sawdust | |
| Wood chips | |
| Cotton and Wool Rags | |
| Hair and fur | |
| Fireplace ashes | |
| Chicken, cow or horse manure |
List of Greens and Browns for Compost
| Greens | Browns |
| 1. Fruit and vegetable peels | 26. Shredded newspaper, office paper/school papers, non-glossy junk mail |
| 2. Citrus rinds | 27. Torn up plain corrugated cardboard boxes (not with glossy coatings) |
| 3. Melon rinds | 30. Straw |
| 4. Coffee grounds | 31. Bedding from hamsters, guinea pigs, rabbits |
| 5. Tea leaves/tea bags | 32. Fall leaves |
| 6. Old vegetables from the crisper | 33. Chopped up twigs and small branches |
| 7. Houseplant trimmings | 34. Pine cones |
| 8. Weeds that haven’t gone to seed | 35.Nut shells (avoid walnut shells as they can inhibit plant growth) |
| 9.Grass clippings | 36.Excelsior |
| 10.Fresh leaves | 37.Raffia |
| 11.Deadheads from flowers | 38.Used napkins |
| 12.Dead plants (as long as they aren’t diseased) | 39.Toilet paper, paper towel, or wrapping paper tubes (cardboard> |
| 13.Seaweed | 40.Fallen bird’s nests |
| 14.Cooked plain rice/pasta | 41.Pine needles/straw |
| 16.Stale bread | 42.Paper coffee filters (used) |
| 17.Corn husks/cobs | 43.Pressed paper egg cartons, torn into small pieces |
| 19.Broccoli stalks | 44.Sawdust (only from untreated wood) |
| 20.Sod that you’ve removed to make new garden beds | 45.Brown paper shopping/lunch bags, shredded/torn |
| 21.Thinnings from the vegetable garden | 46.Leftover peat or coir from seed starting |
| 22.Spent bulbs that you used for forcing indoors | 47.Coir liners for hanging baskets |
| 23.Holiday greenery (from wreaths and swags, for example) — just be sure to cut the stems off of the wreath form or wires first) | 48.Wood chips |
| 24.Old, less flavorful packaged herbs and spices | 49.Bedding from chickens |
| 25.Egg shells |
